To get a successful result, the floor must be properly installed,and the instructions must be followed when using the products.
We therefore recommend to have a floor specialist install the floor. We also recommend that a test be carried out on site to ensure that the products are suitable for the purpose. All Dinesen floors can be full-surface glued with our recommended glue system.
The following instructions provide additional guidance to Dinesen’s general instructions.
Full Surface Gluing
Before the floor is installed, it is important to ensure that the general conditions in the building are under control and in accordance with instructions from STAUF and Dinesenas regards:
In addition, it is important to follow Dinesen’s instructions in general.
The air humidity must be between 35% and 65% RH, and must not exceed 50% RH in winter.
The temperature must be between 18°C and 25°C.
The moisture content of cast substructures must not exceed 85% RH, and the cast substructure must incorporate a moisture barrier. We recommend STAUF VPU 155 S primer. Please note: 85% RH corresponds to approx. 2.0 cm depending on the type of concrete etc.
Be aware of any stricter requirements in the national standard. If a moisture barrier is not used, the moisture content of the concrete must not exceed 65% RH. The moisture content of wood-based substructures must not exceed 10% RH.
Before installing the floor, the cast substrate must be carefully checked in accordance with the relevant guidelines. The substrate must be resistant to pressure and stresses, must not have any cracks, must be of sufficient surface-bonding strength, and must be permanently dry, flat, clean and free of substances that may impair the adhesive properties of the glue. In addition, the porosity and adhesiveness of the surface should also be checked as well as the moisture content, room temperature, air humidity and the temperature of the substrate.
The choice of concrete type can have a strong bearing on drying times. Any moisture in the concrete could damage the wooden floor.
Please note that the drying process is slow. It may take up to several months for the substrate to be sufficiently dry. We strongly recommend that you carry out a destructive test of the cast substrate to check the residual moisture content before applying the recommended primer. In the case of alternative measurement methods and values for residual moisture content in relation to national traditions and standards, please contact STAUF or Dinesen for detailed information.
In the case of underfloor heating in cast substrates, the heating must have been turned on for min. 30 days at normal operating temperature before laying the floor planks. If there is underfloor heating, the heating must be turned off at least 24 hours before full-surface gluing. Leave the underfloor heating off for at least seven days after the floor has been fully glued. Slowly turn up the heat andfollow Dinesen’s ‘Before installation’ instructions.
When using a self-levelling filler, it is necessary to ensure that the products being used are compatible, dry and sufficiently strong. As a minimum, the requirements must correspondto those specified in Section 1.1.1.
The positioning of the moisture barrier must be carefully assessed.
Anhydrite substrates are sensitive to moisture andmay contain additives that make them unsuitable or which require special measures. Special attention should therefore be paid to these types of surfaces when they are being used as a substrate for the full-surface gluing of Dinesen floors.
Check that the construction, the board and the surface are suitable for the purpose. The board floor must be fitted to the subfloor according to the supplier’s instructions. The surface should be lightly sanded before gluing. Make sure that the glue sticks properly to the surface.
For installing flooring on a floating subfloor, the panel layer must be continuous and properly supported. The panel thickness must be min. 1.5 times the thickness of the floor planks to achieve adequate strength.
Full-surface gluing to a wood-based substrate can be combined with concealed screws, where the screw holds the plank in place until the glue has cured. In this way, the requirement that weights are applied to the floor can be partially waived – please note that weights in the peripheral zones are still necessary. We recommend using a screw interval of approx. 600-700 mm.
Please note that screw fixingis only a supplement to full-surface gluing, and that it is the glue which is the main installation method.
Contact STAUF or Dinesen for further advice on other types of subfloors.
Full-surface gluing can be combined with a 3 mm STAUF Comfort Pad which is glued to the subfloor. The comfort pad can be used on both cast substrates as well as wood-based boards. The requirements for subfloors are the same as those which apply for full-surface gluing. Do not screw through the comfort pad.
Lay the comfort pads closely together, but without any overlaps. Use rollers to ensure downward adhesion. Do not start gluing the planks down until at least 24 hours have elapsed.
Use spatulas and glue as described in Table 1, Section 2.3.
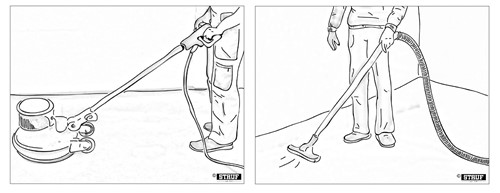
Before installingthe floor, it is necessary to prepare the substrate. The substrate must be clean, flat, permanently dry and without cracks and must have sufficient surface-bonding strength. Depending on the type and condition of the substrate, it may be necessary to prepare the substrate mechanically (machine brushes, sanding, levelling).
Construction joints, expansion joints, holes, marks and other jointscan be closed with suitable material. Contact STAUF for further advice.

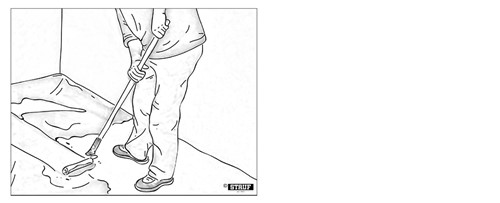
To establish a moisture barrier byusing primer, the following process should used:
Note that the specified drying times apply when the humidity and temperature are between 40-50% RH and 18-22°C, respectively.
The planks must beinstalledwithin 48 hours of applying the primer. If this time limit is exceeded, it is necessary to sandthe surface and apply a new, thin layer of STAUF VPU-155 S primer (100 g/m²).

| Plankebredde Layers | ||||
| Stauf spartula | Staff Comfort Pad | ≤200 mm | >200 mm | |
| No 3; 800-900g/m2 | Yes | No | No | No |
| No 4; 1200-1300g/m2 | No | Yes* | No | Yes* |
| No 14; 1400-1600g/m2 | No | Yes | Yes | Yes |
Table 1 (* Assess whether the condition and surface of the subfloor gives reason to use a larger quantity of glue)
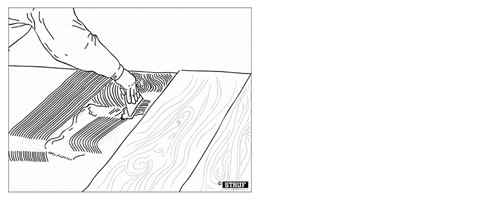
Once the substrate is prepared, apply STAUF SPU 570 glue. The correct quantity of glue and which notched trowel is used depends on the dimensions of the planks. Use spatulas and glue as described in Table 1.
Always make sure that you have used sufficient glue to ensure full-surface gluing of the planks to the substrate. Draw the right notched trowel evenly across the adhesive layer to avoid large concentrations in one place or too thick a layer. Installthe planks within the specified time-frame for the primer, and be aware of the glue’s mounting and curing times.
The glue is fully cured after 48 hours, and everything should be done to avoid walking on the floor during the curing period.

The floor planks must be installed immediately after delivery. In winter, however, the planks should be placed in the room where they are to be installed for 1-2 days before installation.
Supplementary mechanical fastening to wood-based substrates is only possible for planks with fixed tongues and must not take place through comfort pads.
Floor planks must be glued where they butt up against each other at the ends, but they should never be glued lengthways! Oak planks wider than 300 mm must be laid with a 2 mm distance between all the plank rows.
It is recommended that temporary fixing straps are used to ratchet the planks tightly together, and to hold the planks in place until the glue has cured. Be careful not to damage the edges of the floor planks when applying the straps. To ensure a straight line for the rest of the floor, it is recommended that you first install 3-4 rows, allow the glue to dry and then install the rest of the floor.
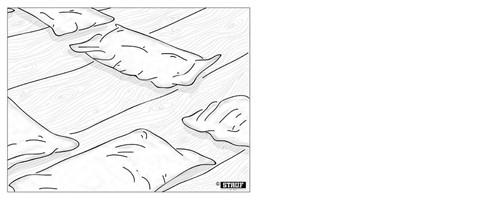
While the glue cures, the floor must be loaded with weights to ensure sufficient pressure across the entire floor surface. Place 15 kg sandbags, buckets filled with sand or similar on the planks. Distribute them evenly with approx. one load per square metre until the glue has cured. The weights should only be removed after 24 hours at the earliest.
The areas along the edges of the floor and the rows which were installed last are particularly important. The floor should not be used until the glue has cured. Sanding and finishing should not be performed until at least 48 hours after the full-surface gluing.

A Dinesen floor is a unique piece of nature. It is a living material that needs looking after with care. Our guides explain in detail how to achieve the best possible results so that the floor can last for generations.
These instructions are not enough on their own. For additional information, please refer to the general instructions from Dinesen and STAUF.
If you need any further advice or guidance on Dinesen floors, you are welcome to contact us. To order and purchase products in the maintenance series, please refer to our webshop.
We make it clear that we alone can advise on our own product, and that any additional advice is beyond our remit. Other building components and products require such specific knowledge and insight that advice must be sought from a professional.
Since the actual quality of the workmanship, the materials which have been used and the conditions on site are beyond our control, this written guide does not constitute a warranty of any kind. The sketches shown are purely indicative. Printing errors and omissions excepted.